Our standard for remote access is to setup the client with SSLVPN connection to their Firebox then RDP into the computer. This allows a secure connection that is optimized for remote work.
# Check SSL VPN Configuration Status
1. Determine the IP address for VPN connection. This should be documented in the VPN asset layout. Otherwise, it can be found in Policy Manager (VPN > Mobile VPN > SSL) ![[Pasted image 20250228135341.png]]
2. Determine the authentication method. This should also be documented in the VPN asset layout.
- AuthPoint: See AuthPoint user setup guide
- Active Directory: Add the user to the documented security group (usually SSLVPN).
- SAML: Add the cloud user to the documented group.
# Download Client Software
1. Go to the [Software Downloads page](https://watchguardsupport.secure.force.com/software/).
2. Do one of the following:
1. From the **Select a device** drop-down list, select the hardware model of the Firebox.
2. In the text box, type the first four digits of the Firebox serial number.
3. In the WatchGuard Mobile VPN with SSL Software section, click the Mobile VPN with SSL for Windows link or the Mobile VPN with SSL for macOS link.
# Install Client Software
## Windows
1. Double-click **WG-MVPN-SSL.exe**.
The Mobile VPN with SSL client Setup Wizard starts.
2. Accept the default settings on each screen of the wizard.
3. (Optional) To add a desktop icon or a Quick Launch icon, select the check box in the wizard that matches the option.
4. Finish and exit the wizard.
## MacOS
1. Make sure that the **System Preferences > Security and Privacy** settings on your Mac allow apps downloaded from **Mac App Store and identified developers**. This is the default setting.
2. Double-click **WG-MVPN-SSL.dmg**.
3. In the WatchGuard Mobile VPN volume, double-click **WatchGuard Mobile VPN with SSL Installer `<version>.mpkg`**.
4. Accept the default settings on each screen of the installer.
5. Finish and exit the installer.
# Connect to SSLVPN
After you start the Mobile VPN with SSL Client, to start the VPN connection, you must specify the authentication server and user account credentials.
The **Server** is the IP address of the primary external interface of a Firebox, or an FQDN that resolves to that IP address. If Mobile VPN with SSL on the Firebox is configured to use a port other than the default port `443`, in the **Server** text box, you must type the IP address or FQDN followed by a colon and the port number. For example, if Mobile VPN with SSL is configured to use port `444`, and the primary external IP address is `203.0.113.2`, the Server is `203.0.113.2:444`.
The **User name** format depends on which authentication server the user authenticates to:
- If the Firebox configuration includes multiple authentication servers, and you want to authenticate to an authentication server that is not the default authentication server, you must specify the authentication server in the **User name** text box.
- If the Firebox configuration includes multiple authentication servers, and you want to authenticate to the default authentication server, you do not need to specify the authentication server in the **User name** text box.
For example, the **User name** must be formatted in one of these ways:
To use the default authentication server, type the user name. Example: `j_smith`
To use another authentication server type the authentication server name or domain name, and then type a backlash (`\`) followed by the user name.
- **Active Directory** — `ad1_example.com\j_smith`
- **Firebox-DB** — `Firebox-DB\j_smith`
- **AuthPoint** (Fireware v12.7 or higher) — `AuthPoint\jsmith`
- **RADIUS** (Fireware v12.5 or higher) — `rad1.example.com\j_smith` or `RADIUS\j_smith`. You must type the domain name specified in the RADIUS settings on Firebox.
- **RADIUS** (Fireware v12.4.1 or lower) — `RADIUS\j_smith`. You must always type RADIUS.
## Mobile VPN with SSL Client Controls
When the Mobile VPN with SSL client runs, the WatchGuard Mobile VPN with SSL icon appears in the system tray (Windows) or on the right side of the menu bar (macOS). The type of magnifying glass icon that appears shows the VPN connection status.
Windows:
-  — The VPN connection is not established.
-  — The VPN connection is established. You can securely connect to resources behind the Firebox.
-  — The client is in the process of connecting or disconnecting. The "W" letter in the icon pulsates.
-  — The client cannot connect to the server. Verify that the server IP address, user name, and password are correct. To troubleshoot further, check the client logs for Mobile VPN with SSL.
macOS:
-  — The VPN connection is not established.
-  — The VPN connection is established. You can securely connect to resources behind the Firebox.
-  — The client is in the process of connecting or disconnecting. The "W" letter in the icon pulsates.
-  — The client cannot connect to the server. Verify that the server IP address, user name, and password are correct. To troubleshoot further, check the client logs for Mobile VPN with SSL.
macOS (Dark Mode):
-  — The VPN connection is not established.
-  — The VPN connection is established. You can securely connect to resources behind the Firebox.
-  — The client is in the process of connecting or disconnecting. The "W" letter in the icon pulsates.
-  — The client cannot connect to the server. Verify that the server IP address, user name, and password are correct. To troubleshoot further, check the client logs for Mobile VPN with SSL.
# Remote Desktop Connection
## Verify Connection
Once you have connected with the SSLVPN client you can confirm you have access to the computer by pinging it.
1. Open Terminal/PowerShell/cmd.
2. Start a ping to the computer via hostname or IP.
```
ping 192.168.1.15
```
3. Verify you receive a reply.
If you do do not receive a reply from the computer then it is possible that the computer is refusing connection (blocked by computer firewall), the hostname is not resolvable (DNS not configured correctly over VPN), or it is not on the network.
## Allow Remote Desktop Connections (Host Computer)
1. Click the **Start** **menu** from your desktop, and then click **Control Panel**.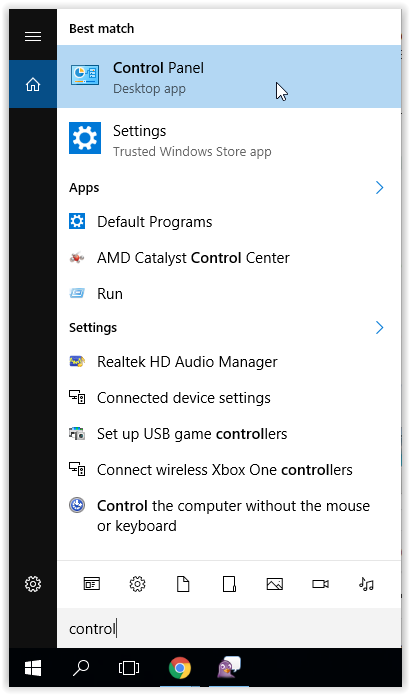
2. Click **System and Security** once the Control Panel opens.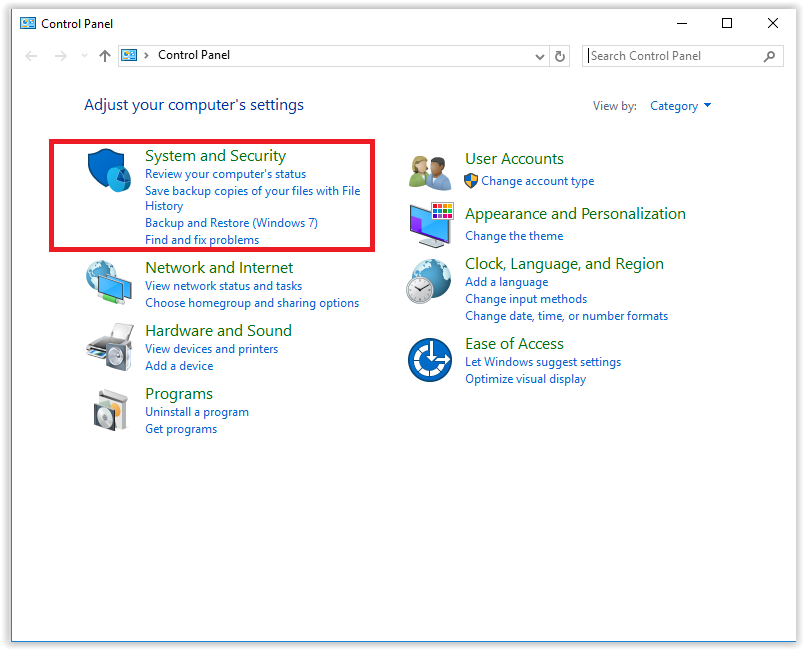
3. Click **Allow remote access,** located under the _System_ tab.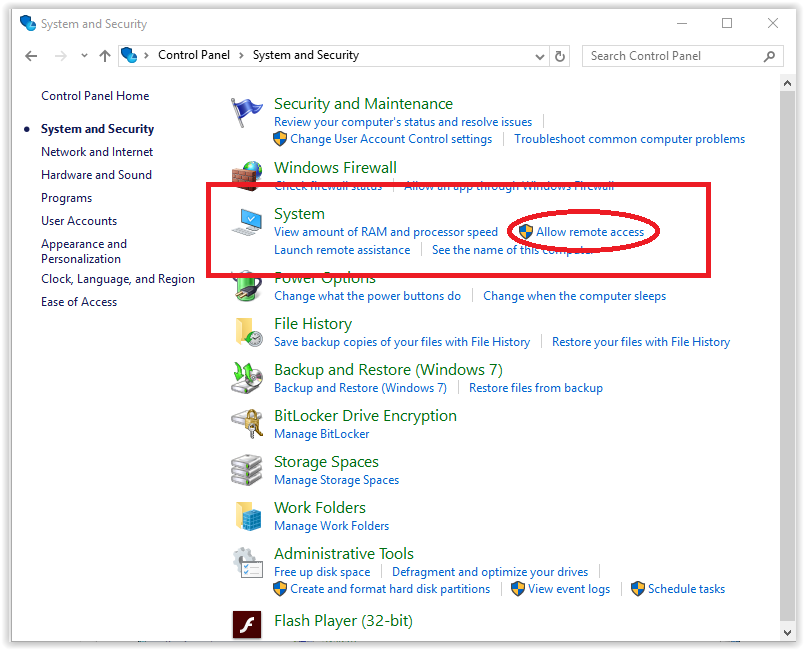
4. Click **Select Users**, located in the _Remote Desktop_ section of the _Remote_ tab.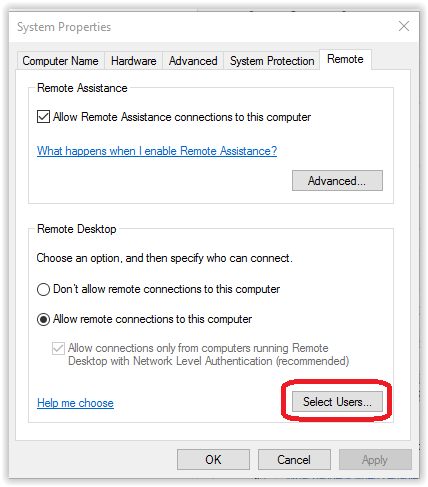
5. Click **Add** from the _System Properties_ box.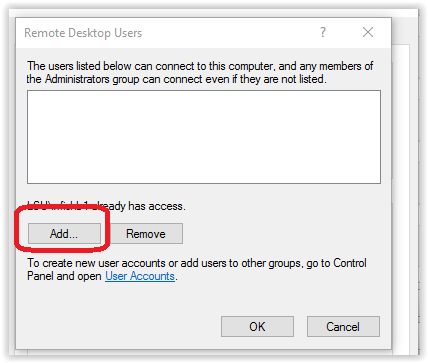
6. Type your **username** and information for anyone else you would like to add. (This will allow _Remote Desktop_ access to the computer which it is set.)
7. Click **OK** when finished.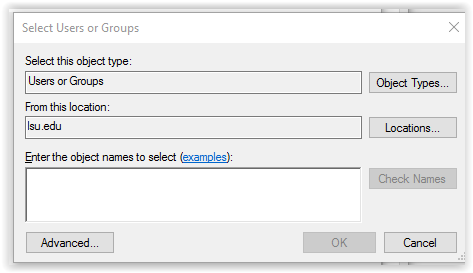
## Establish Remote Desktop Connection (Client Computer)
To use Remote Desktop to connect to the remote PC you set up, type _Remote Desktop Connection_ on your local PC, and then select **Remote Desktop Connection**. Enter the name of the remote PC, then select **Connect**.
# Sources
[Enable Remote Desktop on your PC | Microsoft Learn](https://learn.microsoft.com/en-us/windows-server/remote/remote-desktop-services/clients/remote-desktop-allow-access)
[How to use Remote Desktop | Microsoft Support](https://support.microsoft.com/en-us/windows/how-to-use-remote-desktop-5fe128d5-8fb1-7a23-3b8a-41e636865e8c)
[Windows 10: Allow Access to Use Remote Desktop | LSU GROK](https://grok.lsu.edu/article.aspx?articleid=18609)
[Download, Install, and Connect the Mobile VPN with SSL Client | WatchGuard Help Center](https://www.watchguard.com/help/docs/help-center/en-US/content/en-us/Fireware/mvpn/ssl/mvpn_ssl_client-install_c.html)